Quantcast
Channel: Guides – Nintendo Insider
Viewing all 228 articles
Browse latest View live

Ash Pikachu QR Code For Pokémon Ultra Sun And Ultra Moon

$
0
0

Those that went to see Pokémon the Movie: I Choose You! at cinemas around the world will have received a card with a QR code that will let them unlock a special Pikachu wearing the hat that Ash wears in the film in Pokémon Ultra Sun or Pokémon Ultra Moon.

When this QR code is scanned, players will unlock an in-game event that leads them to Pikachu Valley on Akala Island where a delivery person is waiting to give them their very own Pikachu wearing a Trainer’s Cap – that the community more simply refers to as Ash Pikachu.

The Pikachu will be Level 21 with the moves Thunderbolt, Quick Attack, Thunder, and Iron Tail, has the Static ability, and comes carrying the Pretty Wing as a Hold Item.

Ash Pikachu QR Code (Europe And North America)

ash-pikachu-qr-code-north-america

How To Use The Ash Pikachu QR Code In Pokémon Ultra Sun Or Pokémon Ultra Moon

1. Open QR Scanner from the menu.
2. Scan the QR code.
3. Visit Pikachu Valley on Akala Island (near Route 4).
4. A delivery person will be waiting for you.
5. Talk with the delivery person, and he will give you the Pikachu wearing its Trainer’s Cap.
6. Be sure to save your game!

More Pokémon Ultra Sun and Pokémon Ultra Moon Guides

ash-pikachu-i-choose-you-image

The post Ash Pikachu QR Code For Pokémon Ultra Sun And Ultra Moon appeared first on Nintendo Insider.


Pokémon Ultra Sun And Moon Move Tutor, Reminder And Deleter Locations

$
0
0

There are many Move Tutors in Pokémon Ultra Sun and Pokémon Ultra Moon that can help teach your Pokémon new moves either for free or in exchange for Battle Points (BP) that you have earned.

Where To Find The Move Reminder In Pokémon Ultra Sun And Ultra Moon

The Move Reminder is stood inside the Pokémon Center at Mount Lanakila on Ula’ula Island and is an important character for those looking to rebalance and tweak their teams. She can teach your Pokémon a move that it has either forgotten or that you decided that it shouldn’t learn as it levelled up.

That means that her role is particularly helpful if there is a move that you now need, or replacing one that you had accidentally deleted. And, in Pokémon Ultra Sun and Pokémon Ultra Moon, she can now teach your Pokémon a move before it reaches the level that is normally required.

Where To Find The Move Deleter In Pokémon Ultra Sun And Ultra Moon

The Move Deleter no longer plays as important a role in Pokémon Ultra Sun and Pokémon Ultra Moon, as most players used to hunt him down in past games to delete moves that were learned from an HM. Now that Poké Rides have replaced them, he’s not in demand as much, but, if you want to delete any Pokémon move, he can be found at the Pokémon Center in Hau’oli City.

Where To Find Move Tutors In Pokémon Ultra Sun And Ultra Moon

Big Wave Beach Move Tutor

The Move Tutor on Big Wave Beach is stood behind a counter under a white and blue gazeebo, and can teach your Pokémon a specific move in exchange for Battle Points (BP).

The moves that she can teach, are:

  • Bind- 4 BP
  • Bug Bite – 4 BP
  • Covet – 4 BP
  • Snore – 4 BP
  • Block – 8 BP
  • Defog – 8 BP
  • Electroweb – 8 BP
  • Heal Bell – 8 BP
  • Helping Hand – 8 BP
  • Low Kick- 8 BP
  • Recycle – 8 BP
  • Shock Wave – 4 BP
  • Snatch – 8 BP
  • Uproar- 8 BP
  • Worry Seed – 8 BP
  • Last Resort – 12 BP

Heahea Beach Move Tutor

The Move Tutor on Heahea Beach is behind a counter under another gazeebo, and she can teach your Pokémon a specific move in exchange for Battle Points (BP). Those available, are:

  • Water Pulse – 4 BP
  • After You – 8 BP
  • Ally Switch – 8 BP
  • Bounce – 8 BP
  • Fire Punch – 8 BP
  • Giga Drain – 8 BP
  • Gravity – 8 BP
  • Iron Defense – 8 BP
  • Iron Tail – 8 BP
  • Magnet Rise – 8 BP
  • Role Play – 8 BP
  • Signal Beam – 8 BP
  • Spite – 8 BP
  • Stealth Rock – 8 BP
  • Synthesis – 8 BP
  • Telekinesis – 8 BP

Ula’ula Beach Move Tutor

The Move Tutor on Ula’ula Beach is behind a counter under a larger gazeebo, and she can teach your Pokémon a specific move in exchange for Battle Points (BP). Those available, are:

  • Drill Run – 8 BP
  • Ice Punch – 8 BP
  • Iron Head – 8 BP
  • Magic Coat – 8 BP
  • Pain Split – 8 BP
  • Tailwind – 8 BP
  • Thunder Punch – 8 BP
  • Trick – 8 BP
  • Wonder Room – 8 BP
  • Zen Headbutt – 8 BP
  • Aqua Tail – 12 BP
  • Icy Wind – 12 BP
  • Laser Focus – 12 BP
  • Seed Bomb – 12 BP
  • Endeavor – 16 BP
  • Focus Punch – 16 BP

Battle Tree Move Tutor

The Move Tutor in the Battle Tree is behind a counter near three other NPCs, and he can teach your Pokémon a specific move in exchange for Battle Points (BP). Those available, are:

  • Drain Punch – 8 BP
  • Gastro Acid – 8 BP
  • Skill Swap – 8 BP
  • Dual Chop – 12 BP
  • Dragon Pulse – 12 BP
  • Earth Power – 12 BP
  • Foul Play – 12 BP
  • Heat Wave – 12 BP
  • Hyper Voice – 12 BP
  • Knock Off – 12 BP
  • Stomping Tantrum – 12 BP
  • Super Fang – 12 BP
  • Gunk Shot – 16 BP
  • Liquidation – 16 BP
  • Outrage – 16 BP
  • Sky Attack – 16 BP
  • Superpower – 16 BP
  • Throat Chop – 16 BP

Grass Pledge, Fire Pledge And Water Pledge Move Tutor

The Move Tutor that can teach your starter Pokémon from all regions Grass Pledge, Fire Pledge and Water Pledge moves and is located in the Hau’oli City Mall in the booth with Mr. Hyper.

Frenzy Plant, Blast Burn And Hydro Cannon Move Tutor

The Move Tutor that can teach your fully evolved starter Pokémon from all regions Frenzy Plant, Blast Burn and Hydro Cannon moves and is located in the Hau’oli City Mall in the booth with Mr. Hyper.

Volt Tackle Move Tutor

Volt Tackle is a move that Pikachu requires to use the Z-Move Catastropika. In order to get it, you will need to help keep a reporter away from the famous Pikachu at the Hano Grand Resort.

Secret Sword And Relic Song Move Tutor

There is a gentleman in the hotel at Hano Grand Resort that can teach the special move Secret Sword to Keldeo, and Relic Song to Meloetta. These are required for Keldeo to become Resolute Form, and for Meloetta to turn into its Pirouette Forme.

Draco Meteor Move Tutor

There is an Ace Trainer at the Pokémon Center in Seafolk Village that can teach Draco Meteor to any Dragon-type Pokémon, which includes Arceus and Silvally when they are holding Draco Plate and Dragon Memory.

Dragon Ascent Move Tutor

The Move Tutor that can teach Rayquaza the Dragon Ascent move can be found at the Pokémon Center in Seafolk Village, with the move being required to Mega Evolve into Mega Rayquaza.

More Pokémon Ultra Sun and Pokémon Ultra Moon Guides

The post Pokémon Ultra Sun And Moon Move Tutor, Reminder And Deleter Locations appeared first on Nintendo Insider.

Pokémon Ultra Sun And Moon Pikachu Valley Pikachu Professor Quiz Answers

$
0
0

When players scan the Ash Pikachu QR Code with the QR Scanner in Pokémon Ultra Sun and Pokémon Ultra Moon, it will see them unlock an in-game event that will lead them to Pikachu Valley on Akala Island – near Route 4.

When you arrive, you will be given a special Pikachu frame that you can use to decorate photos in your Photo Album. But, near the waterfall to the right, there is a lady that will challenge you to with the Pikachu Professor quiz.

If you ace the quiz you will receive a Pikachu Shirt and Pikachu Cap, which are some of the many clothing choices that you can make as part of the trainer customisation options in the game.

Question 1: By what part of a Pikachu’s body can you tell whether it’s a male or a female?

Ears
Tail
Feet
Eyes

Question 2: What are the particular parts of Pikachu’s cheeks called?

Scent sacs
Foraging sacs
Electric sacs
Soot sacks

Question 3: What do you need to evolve a Pikachu into a Raichu?

Make it affectionate
Level it up
Use a Light Ball
Use a Thunder Stone

Question 4: How is a Shiny Pikachu different from more common Pikachu specimens?

Its coloring is darker
Its coloring is lighter
Its coloring is see-through
Its body is all white

Question 5: But who was the first person to discover the existence of Pichu?

Professor Oak
Professor Elm
Professor Sycamore
Professor Kukui

More Pokémon Ultra Sun and Pokémon Ultra Moon Guides

The post Pokémon Ultra Sun And Moon Pikachu Valley Pikachu Professor Quiz Answers appeared first on Nintendo Insider.

Pokémon Ultra Sun And Moon TM Locations List

$
0
0

A Technical Machine (TM) can teach your Pokémon new moves that they would otherwise be unable to learn in Pokémon Ultra Sun and Pokémon Ultra Moon, but the items will first need to be collected.

Before Pokémon Black and Pokémon White, TMs were single-use items but in Generation V a change was made to allow players to use them an unlimited number of times.

We have prepared the following list to help you hunt them out, naming all of the moves taught by the TMs, their locations and, where applicable, their prices to purchase them in the Nintendo 3DS exclusives.

Pokémon Ultra Sun And Ultra Moon TM Locations List

TM01 Work Up

This can be received from a Rising Star in the Trainers’ School.

TM02 Dragon Claw

This can be found at the Trial site in the Vast Poni Canyon.

TM03 Psyshock

This can be found at the Lake of the Moone in Pokémon Ultra Sun, or at the Lake of the Sunne in Pokémon Ultra Moon.

TM04 Calm Mind

This can be purchased for 10,000 Pokémon Dollars at the Seafolk Village Poké Mart.

TM05 Roar

This can be found in Kala’e Bay.

TM06 Toxic

This can be found at the dock in Aether Paradise.

TM07 Hail

This can be bought for 50,000 Pokémon Dollars at the Royal Avenue Poké Mart.

TM08 Bulk Up

This can be received from the Black Belt in Royal Avenue.

TM09 Venoshock

This can be bought for 10,000 Pokémon Dollars at the TM Shop in Konikoni City.

TM10 Hidden Power

This can be received from a Pokémon Breeder at the Pokémon Nursery.

TM11 Sunny Day

This can be bought for 50,000 Pokémon Dollars at the Royal Avenue Poké Mart.

TM12 Taunt

This can be received from the man in a trailer on Route 13.

TM13 Ice Beam

This can be found on Mount Lanakila.

TM14 Blizzard

This can be bought for 30,000 Pokémon Dollars at the Seafolk Village Poké Mart.

TM15 Hyper Beam

This can be bought for 50,000 Pokémon Dollars at the Seafolk Village Poké Mart.

TM16 Light Screen

This can be bought for 10,000 Pokémon Dollars at the Heahea City Poké Mart.

TM17 Protect

This can be bought for 10,000 Pokémon Dollars at the Heahea City Poké Mart.

TM18 Rain Dance

This can be bought for 50,000 Pokémon Dollars at the Royal Avenue Poké Mart.

TM19 Roost

This is received from the Ace Trainer after defeating all Trainers on Route 3.

TM20 Safeguard

This can be bought for 10,000 Pokémon Dollars at the Heahea City Poké Mart.

TM21 Frustration

This can be received from an Oranguru in the Malasada Shop in Malie City at night.

TM22 Solar Beam

This can be bought for 10,000 Pokémon Dollars at the Seafolk Village Poké Mart.

TM23 Smack Down

This can be found in the Farthest Hollow in Ten Carat Hill.

TM24 Thunderbolt

This can be found in the Sandy Cave on Big Wave Beach.

TM25 Thunder

This can be bought for 30,000 Pokémon Dollars at the Seafolk Village Poké Mart.

TM26 Earthquake

This can be found at the entrance to Resolution Cave after you have entered the Hall of Fame.

TM27 Return

This can be received from a Police Officer in the Malasada Shop in Malie City at night.

TM28 Leech Life

This can be found in Akala Outskirts.

TM29 Psychic

This can be received from Wicke in Aether Paradise.

TM30 Shadow Ball

This can be found on Route 14.

TM31 Brick Break

This can be found in Verdant Cavern.

TM32 Double Team

This can be found on Route 7.

TM33 Reflect

This can be bought for 10,000 Pokémon Dollars at the Heahea City Poké Mart.

TM34 Sludge Wave

This can be bought for 10,000 Pokémon Dollars at the Seafolk Village Poké Mart.

TM35 Flamethrower

This can be found in the third cave in the Vast Poni Canyon.

TM36 Sludge Bomb

This can be found in the Shady House.

TM37 Sandstorm

This can be bought for 50,000 Pokémon Dollars at the Royal Avenue Poké Mart.

TM38 Fire Blast

This can be bought for 30,000 Pokémon Dollars at the Seafolk Village Poké Mart.

TM39 Rock Tomb

This can be found in Wela Volcano Park.

TM40 Aerial Ace

This can be bought for 10,000 Pokémon Dollars at the TM Shop in Konikoni City.

TM41 Torment

This can be found on Route 5 (South).

TM42 Facade

This can be bought for 10,000 Pokémon Dollars at the Malie City Poké Mart.

TM43 Flame Charge

This can be received from Colress on Route 8.

TM44 Rest

This can be received from Hypno in Thrifty Megamart.

TM45 Attract

This can be received from the Machamp caddy in Hano Grand Hotel.

TM46 Thief

This can be found in Verdant Cavern.

TM47 Low Sweep

This can be bought for 10,000 Pokémon Dollars at the TM Shop in Konikoni City.

TM48 Round

This can be received from a Janitoy as a reward for helping to clean the Shopping Mall at night.

TM49 Echoed Voice

This can be found in Hau’oli City Shopping District.

TM50 Overheat

This can be found in Poni Meadow at night after you have entered the Hall of Fame.

TM51 Steel Wing

This can be bought for 10,000 Pokémon Dollars at the TM Shop in Konikoni City.

TM52 Focus Blast

This can be bought for 30,000 Pokémon Dollars at the Seafolk Village Poké Mart.

TM53 Energy Ball

This can be found on Route 8.

TM54 False Swipe

This is received from Professor Kukui after completing Hala’s Grand Trial.

TM55 Scald

This can be found in Ancient Poni Path.

TM56 Fling

This can be received from a mourning woman at the Hau’oli Cemetery at night.

TM57 Charge Beam

This can be found on Brooklet Hill.

TM58 Sky Drop

This can be received from an Ace Trainer after defeating all Trainers on Route 8.

TM59 Brutal Swing

This can be found on Route 5 (North).

TM60 Quash

This can be received from an Ace Trainer after defeating all Trainers around Poni Plains, but only after entering the Hall of Fame.

TM61 Will-O-Wisp

This can be found in Konikoni City.

TM62 Acrobatics

This can be found on Route 15.

TM63 Embargo

This can be received from a Scientist in the Geothermal Power Plant during the day.

TM64 Explosion

This can be found in Ten Carat Hill.

TM65 Shadow Claw

This can be bought for 10,000 Pokémon Dollars at the Malie City Poké Mart.

TM66 Payback

This is received from the Black Belt on Route 11.

TM67 Smart Strike

This is received from Professor Kukui after completing Mallow’s Trial.

TM68 Giga Impact

This can be bought for 50,000 Pokémon Dollars at the Seafolk Village Poké Mart.

TM69 Rock Polish

This can be bought for 10,000 Pokémon Dollars at the Malie City Poké Mart.

TM70 Aurora Veil

This can be bought for 30,000 Pokémon Dollars at the Heahea City Poké Mart.

TM71 Stone Edge

This can be bought for 30,000 Pokémon Dollars at the Seafolk Village Poké Mart.

TM72 Volt Switch

This can be found on Mount Hokulani.

TM73 Thunder Wave

This can be found in Malie Garden.

TM74 Gyro Ball

This can be found on Route 11.

TM75 Swords Dance

This can be received from Actor Meredith.

TM76 Fly

This can be received from a woman in Malie Library.

TM77 Psych Up

This can be bought for 10,000 Pokémon Dollars at the Malie City Poké Mart.

TM78 Bulldoze

This can be bought for 10,000 Pokémon Dollars at the TM Shop in Konikoni City.

TM79 Frost Breath

This can be found in Seaward Cave.

TM80 Rock Slide

This can be found on Route 17.

TM81 X-Scissor

This can be found on Route 16.

TM82 Dragon Tail

This is received from a Collector after defeating all Trainers on Route 12.

TM83 Infestation

This can be found on Route 3.

TM84 Poison Jab

This can be found on Mount Lanakila.

TM85 Dream Eater

This can be found in Haina Desert (Area 4).

TM86 Grass Knot

This can be found in Lush Jungle.

TM87 Swagger

This can be received from Guzma’s Mom in his house on Route 2.

TM88 Sleep Talk

This can be found in Paniola Town.

TM89 U-Turn

This can be bought for 10,000 Pokémon Dollars in Malie City Poké Mart.

TM90 Subsitute

This can be received from Professor Kukui in the Pokémon Research Lab after entering the Hall of Fame.

TM91 Flash Cannon

This can be found in Seafolk Village.

TM92 Trick Room

This can be received from Kahili at Hano Grand Resort after entering the Hall of Fame.

TM93 Wild Charge

This can be found in Vast Poni Canyon.

TM94 Surf

This can be received from Swimmer Girls on Poni Breaker Coast after entering the Hall of Fame.

TM95 Snarl

This can be received from a Veteran after defeating all Trainers on Mount Hokulani.

TM96 Nature Power

This can be received from a Trial Guide after defeating all Trainers on Route 5.

TM97 Dark Pulse

This can be found on Poni Coast after entering the Hall of Fame.

TM98 Waterfall

This can be received from Swimmer Girls on Poni Breaker Coast after entering the Hall of Fame.

TM99 Dazzling Gleam

This can be found in the Vast Poni Canyon.

TM100 Confide

This can be found in the Hau’oli Cemetery.

More Pokémon Ultra Sun and Pokémon Ultra Moon Guides

The post Pokémon Ultra Sun And Moon TM Locations List appeared first on Nintendo Insider.

Pokémon Ultra Sun And Moon Wormholes And Legendary Pokémon Locations

$
0
0

Legendary Pokémon are among the rarest pocket monsters that you can find, and Pokémon Ultra Sun and Pokémon Ultra Moon give you access to every one that has ever existed, besides Mythical Pokémon.

To get them in the Nintendo 3DS exclusives, you need to go through the Ultra Wormhole at Altar of the Sunne and Altar of the Moone. When you leap through here, you get into the Ultra Warp Ride where you’ll zoom past many Ultra Wormholes.

The colour of the Ultra Wormhole determines the Pokémon that you will find and the further you travel, the more likely it is that you will find a Legendary Pokémon.

In addition to this, the Ultra Wormholes will have various rings around them. The more rings surrounding them, the rarer the Pokémon so always aim for a two-ringed Wormhole or higher in order to get the best chance of getting the Legendary Pok€mon.

White Wormholes

Buzzwole (exclusive to Pokémon Ultra Sun), Celesteela (exclusive to Pokémon Ultra Moon), Guzzlord, Kartana (exclusive to Pokémon Ultra Sun), Nihilego, Pheromosa (exclusive to Pokémon Ultra Moon), and Xurkitree.

Blue Wormholes

Azelf, Kyogre (exclusive to Pokémon Ultra Moon), Kyurem (requires Reshiram and Zekrom in your team), Latias (exclusive to Pokémon Ultra Moon), Latios (exclusive to Pokémon Ultra Sun), Lugia (exclusive to Pokémon Ultra Moon), Mesprit, Suicune (requires Entei and Raikou in your team), and Uxie.

Green Wormholes

Cobalion, Dialga (exclusive to Pokémon Ultra Sun), Entei (exclusive to Pokémon Ultra Moon), Mewtwo, Raikou (exclusive to Pokémon Ultra Sun), Reshiram (exclusive to Pokémon Ultra Sun), Terrakion, Virizion, Xerneas (exclusive to Pokémon Ultra Sun), and Zekrom (exclusive to Pokémon Ultra Moon).

Red Wormholes

Articuno, Cresselia, Ho-Oh (exclusive to Pokémon Ultra Sun), Landorus (requires Tornadus and Thundurus on your team), Moltres, Rayquaza (requires Groudon and Kyogre on your team), Thundurus (exclusive to Pokémon Ultra Moon), Tornadus (exclusive to Pokémon Ultra Sun), Yveltal (exclusive to Pokémon Ultra Moon), and Zapdos.

Yellow Wormholes

Giratina (requires Dialga and Palkia on your team), Groudon (exclusive to Pokémon Ultra Sun), Heatran (exclusive to Pokémon Ultra Sun), Palkia (exclusive to Pokémon Ultra Moon), Regice, Regigigas (exclusive to Pokémon Ultra Moon), Regirock, and Registeel.

More Pokémon Ultra Sun and Pokémon Ultra Moon Guides

The post Pokémon Ultra Sun And Moon Wormholes And Legendary Pokémon Locations appeared first on Nintendo Insider.

Pokémon Ultra Sun And Moon Ditto Five Locations

$
0
0

Getting the best competitive Pokémon is always a tricky thing. With lots of chain breeding, it’s always really hard to get with a lot of chaining and hoping. With the Destiny Knot, you can pass down five IVs from the parents, but in Pokémon Ultra Sun and Pokémon Ultra Moon, there is a little trick.

One of the side quests in the game has you search for the Ditto Five. In Route 9, you will be informed that there are various Ditto posing as humans across Route 9 and Konikoni City. There are five of these Ditto and this may seem like an innocuous side-quest, but there’s a perk.

Each of the five Ditto has got special competitively viable elements. They have the most competitively viable natures, and to top it off, they have some excellent IVs.

  • Route 9’s Police Station: Bold Nature. Maximum IV of Defense, high IV of Special Attack, 0 IV in Speed.
  • Konikoni City’s Herb Seller by Alola Photo Club: Jolly Nature. Maximum IV in Speed, high IVs in Defense and Special Attack.
  • Chef in Konikoni City Restauraunt: Adamant Nature. Maximum IV in Attack, high IVs in Defense and Speed.
  • Konikoni City Massage: Modest Nature. Maximum IV in Special Attack, high IV in Special Defense, 0 IV in Attack.
  • Oliva in Konikoni City: Timid Nature. Maximum IV in Speed, high IV in Attack and Special Defense.

While these Ditto are not all five or six-maximum IV Pokémon, the IVs and natures are perfect to get you well on your way to breeding a competitive team through the usual breeding mechanics.

More Pokémon Ultra Sun and Pokémon Ultra Moon Guides

The post Pokémon Ultra Sun And Moon Ditto Five Locations appeared first on Nintendo Insider.

How To Get Zeraora In Pokémon Ultra Sun And Ultra Moon

$
0
0

If capturing the Legendary Pokémon that appear in Pokémon Ultra Sun and Pokémon Ultra Moon wasn’t keeping you busy enough, many have been wondering how they can get Zeraora in the Nintendo 3DS exclusives.

But, the problem is that Zeraora hasn’t even been officially announced. It was data miners that leaked the existence of the new Mythical Pokémon, and it is believed that Zeraora will be made available in a special event next year.

That will be when it is released as a Mystery Gift, but whether that will be down to retailers to hand out special codes or an online distribution event is unclear.

Known as the Thunderclap Pokémon, it has been discovered that Zeraora is an Electric-type Mythical Pokémon with the Volt Absorb ability – which lets it heal up to a quarter of its maximum Hit Points when struck with an Electric-type move.

We will let you know whenever the distribution event is announced, but, for now, here’s everything that we know about Zeraora at this point in time:

Zeraora

zeraora-image

Category: Thunderclap Pokémon
Type: Electric
Height: 4’11”
Weight: 98.1lbs
Ability: Volt Absorb

Pokémon Ultra Sun Pokédex Description

It electrifies its claws and tears its opponents apart with them. Even if they dodge its attack, they’ll be electrocuted by the flying sparks.

Pokémon Ultra Moon Pokédex Description

It approaches its enemies at the speed of lightning, then tears them limb from limb with its sharp claws.

The post How To Get Zeraora In Pokémon Ultra Sun And Ultra Moon appeared first on Nintendo Insider.

Xenoblade Chronicles 2 Japanese Voice Option, Dual Audio And Everything You Need To Know

$
0
0

Xenoblade Chronicles 2 closes out what has been an incredible first calendar year for Nintendo Switch, and, while the English voice actors present an incredible mixture of regional accents, there are those of you out there that may prefer the Japanese voice option.

While it was implied at E3 2017 that Monolith Soft’s expansive RPG would have no dual audio option, there seemed to be a change of heart when, in the Xenoblade Chronicles 2 Direct, Nintendo shared that a Japanese voice pack would be made available on the Nintendo eShop.

That means that it isn’t present in the Nintendo Switch exclusive straight away, so, if you have bought your copy and are wondering what to do, we’re here to help!

How To Get The Xenoblade Chronicles 2 Japanese Voice Option And Dual Audio

The Japanese Voice Pack is available as a free download on the Nintendo eShop, and, for those interested, it will require 871 MB in either the portable home console’s internal storage space or on a MicroSD Card.

It is easiest to find the Japanese Voice Pack by navigating to the Xenoblade Chronicles 2 page on the Nintendo eShop, where, if you scroll down, it is as listed as downloadable content alongside the game’s Expansion Pass. This week, that can be quickly found in the Recent Releases category, but, eventually, you may need to use the Search function.

Once selected and downloaded, there’s one more thing that you will need to do. The Japanese language option was added in software update version 1.1.0. To check which version you have, hit the Start button on the game icon and it will say at the top of the screen. Or, if you prefer, you can load up the game and it is detailed in the top-right corner of the main menu screen. If you need to update Xenoblade Chronicles 2, then scroll to Software Update and then Via the Internet to do so.

How To Change Voice Language In Xenoblade Chronicles 2

There are two places that you can change the in-game voice language in Xenoblade Chronicles 2. The first is on the main menu screen, where, once you select Options, you can adjust the Sound Settings. In this menu are multiple volume options, but, right at the bottom, you will see the option to change the in-game voice settings from English to Japanese.

The second is the same Options menu but having to navigate to it while you are playing the game – which becomes an ever so slightly longer process. At any time, you can press the Start button, navigate right to the System option, Options, and then Sound Settings, where you can continue as above.

Whether you prefer to play with the English or Japanese voice option is entirely a personal choice, but you can freely switch between the two whenever you wish. With the Events Theater that was added at launch, you can now rewatch any cutscene that you have seen in the game – which, if you hadn’t realised, presents the chance to watch them all in both languages!

The post Xenoblade Chronicles 2 Japanese Voice Option, Dual Audio And Everything You Need To Know appeared first on Nintendo Insider.


Xenoblade Chronicles 2 Rare Blades, Core Crystals And Where To Find Them

$
0
0

Blades are integral to the battle system in Xenoblade Chronicles 2, artificial lifeforms that Drivers have the power to bond with. They not only grant a Driver their weapons, but they are allies, whose destinies become intertwined as they grow together.

When a Driver resonates with a Core Crystal they can generate new Blades to bond with, and, while the common Blades serve their purpose well enough, it is the Rare Blades that are the ones that you will be hoping for. That’s because the process is random, in that you choose a Core Crystal to resonate with and then leave it to lady luck as to which Blade you will be rewarded with.

There are Rare Blades that are unlocked through story progression, too, with players also able to complete specific side quests in Xenoblade Chronicles 2 to resonate with others. But, the bulk of the Rare Blades will be purely down to chance.

It’s worth it, though, as these Rare Blades can not only have access to their own unique side quests and Heart-to-Heart events, but have far more complex Affinity Charts, meaning that they can eventually become the most powerful Blades in the entire game.

Xenoblade Chronicles 2 Core Crystals, Where To Find Them And How To Use Them

Core Crystals are an item that you will continuously stumble upon in Xenoblade Chronicles 2, thankfully. There are Common, Rare, Legendary, Beast, and other kinds that you will get your hands on – whether they are dropped after encounters, discovered in a treasure chest, or through other means.

When you are ready to use them, press Start to open the menu, and then select Blades. It is the Bond Blade option that you want, the process in which the player can awaken a new Blade from any Core Crystal that they have collected.

It’s worth mentioning that the Blade is tied to the Driver that it bonds with, and while there is an Overdrive Protocol item that can be used to transfer them between Drivers, these are scarce – in our experience. And Tora, as he is not a Driver and relies on his artificial Blade to fight, cannot bond with Core Crystals.

Once you have chosen the character you want to resonate with a Core Crystal, the rest, as we’ve mentioned before, is down to luck. Cross everything you possibly can, and hope that a Rare Blade soon appears.

We have listed every Rare Blade that is in Xenoblade Chronicles 2, their element, role in battle, Field Skills, and how to obtain them, below as a reference point. But, as always, please be aware that this contains spoilers!

xenoblade-chronicles-2-rare-blades-floren-screenshot

Xenoblade Chronicles 2 Rare Blades List

Adenine

Element: Wind
Role: Healer
Field Skills: Wind Mastery, Keen Eye, Extra-Ancient Wisdom
Adenina can be obtained from a Common, Rare, or Legendary Core Crystal.

Aegaeon

Element: Water
Role: Tank
Field Skills: Water Mastery, Ancient Wisdom, Leaping
Aegaeon is obtained through the main story progression, and can only be used by Mòrag.

Agate

Element: Earth
Role: Attacker
Field Skills: Mineralogy, Keen Eye
Agate is obtained from a Common, Rare, or Legendary Core Crystal.

Azami

Element: Dark
Role: Attacker
Field Skills: Dark Mastery, Botany, Clairvoyant Eye
Azami is obtained from a Common, Rare, or Legendary Core Crystal.

Boreas

Element: Wind
Role: Healer
Field Skills: Nopon Wisdom, Salvaging Mastery, Fleet of Foot
Boreas is obtained from a Common, Rare, or Legendary Core Crystal.

Brighid

Element: Fire
Role: Tank
Field Skills: Fire Mastery, Keen Eye, Mineralogy
Brighid is obtained Acquired through the main story progression, and can only be used by Mòrag.

Dagas

Element: Fire
Role: Attacker
Field Skills: Cavalier Attitude
Dagas is obtained from a Common, Rare, or Legendary Core Crystal.

Dahlia

Element: Ice
Role: Healer
Field Skills: Forestry, Ice Mastery
Dahlia is obtained from a Common, Rare, or Legendary Core Crystal.

Dromarch

Element: Water
Role: Healer
Field Skills: Water Mastery, Botany, Ancient Wisdom
Dromarch is obtained through the main story progression, and can only be used by Nia.

Electra

Element: Electric
Role: Tank
Field Skills: Electric Mastery, Focus, Master of Thunder
Electra can be obtained from a Common, Rare, or Legendary Core Crystal.

Finch

Element: Wind
Role: Tank
Field Skills: Entomology, Leaping, Birdbrain
Finch can be obtained from a Common, Rare, or Legendary Core Crystal.
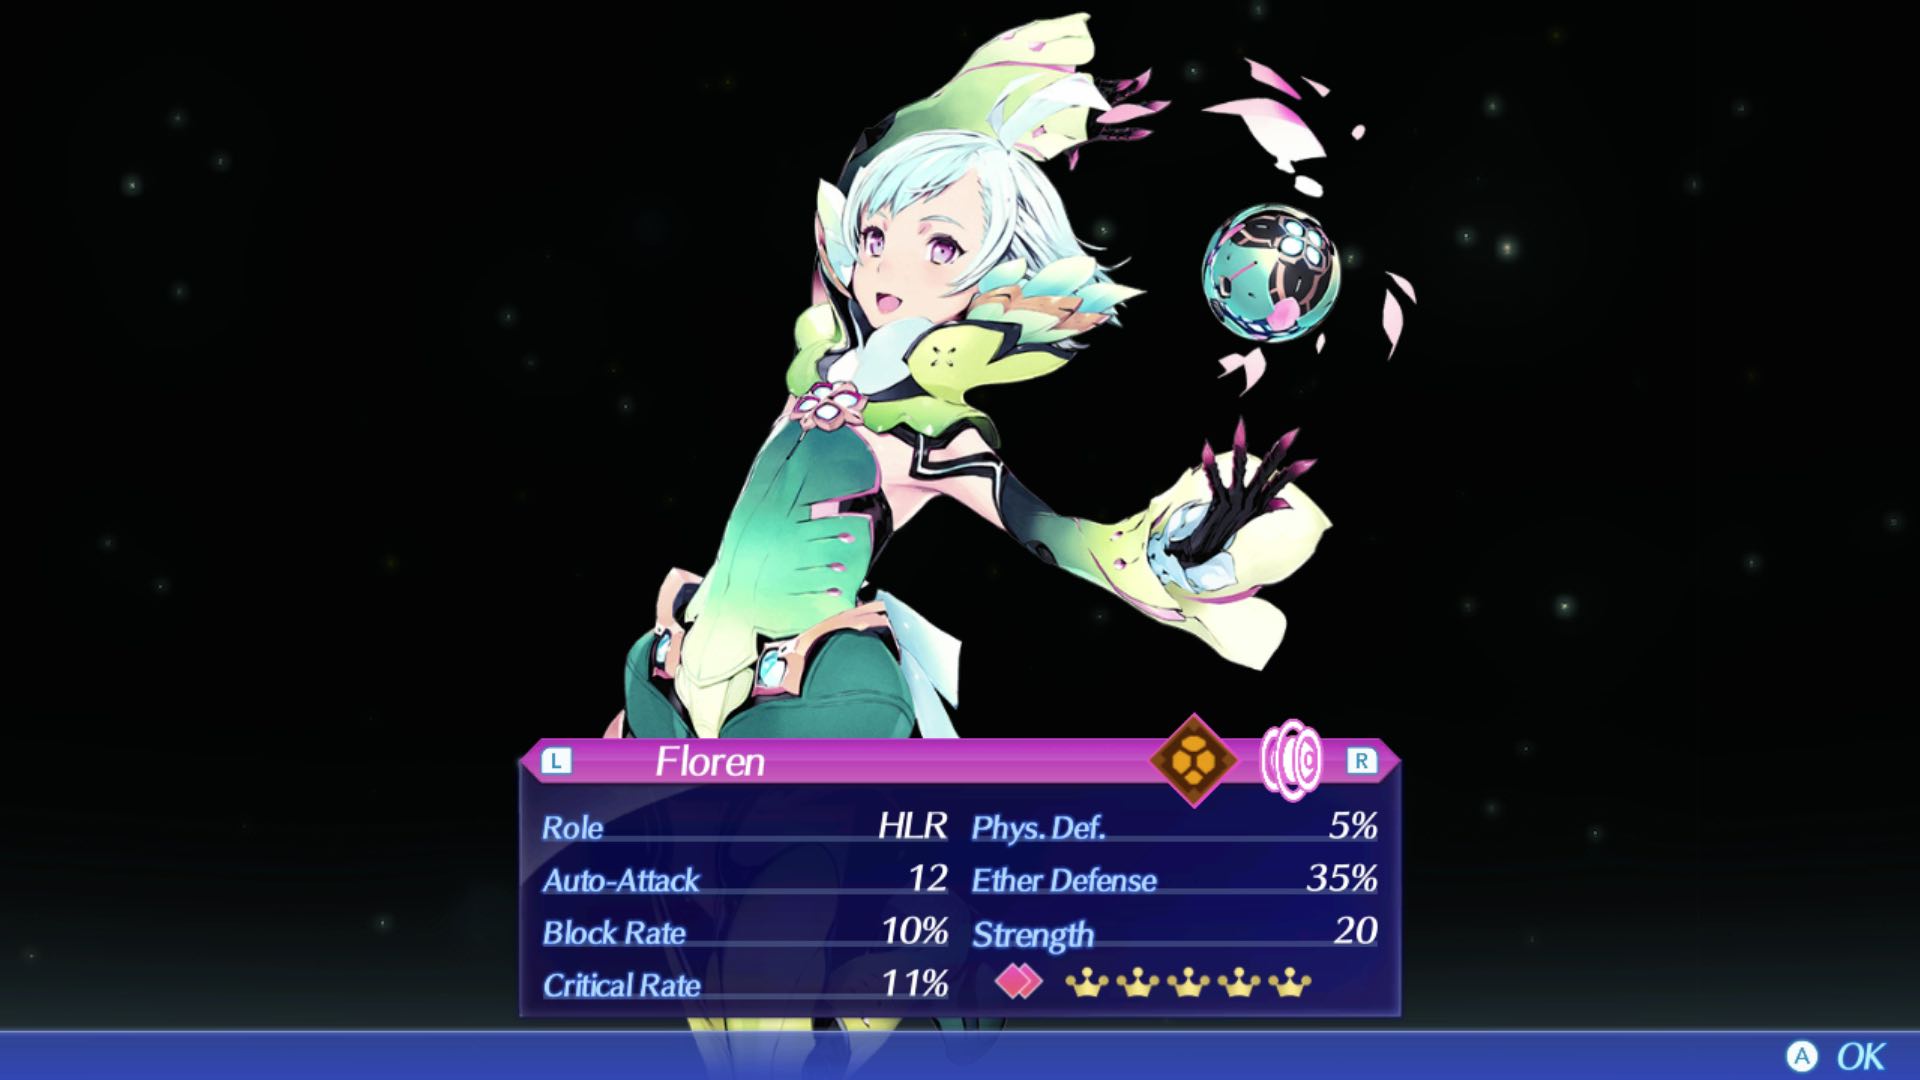
Floren

Element: Earth
Role: Healer
Field Skills: Botany, Earth Mastery, Beguiling Charm
Floren can be obtained from a Common, Rare, or Legendary Core Crystal.

Godfrey

Element: Ice
Role: Tank
Field Skills: Passionate Soul, Justice-Loving Soul, Kind Soul
Godfrey can be obtained from a Common, Rare, or Legendary Core Crystal.

Gorg

Element: Water
Role: Attacker
Field Skills: Keen Eye, Fortitude
Gorg can be obtained from a Common, Rare, or Legendary Core Crystal.

Herald

Element: Electric
Role: Attacker
Field Skills: Electric Mastery, Superstrength, Rampage
Herald can be obtained by fulfilling the offerings at the Shrine of Sealing in Theosoir (Kingdom of Tantal) to receive her Sealed Core Crystal.

Kasandra

Element: Earth
Role: Tank
Field Skills: Earth Mastery, One Lucky Gal
Kasandra can be obtained from a Common, Rare, or Legendary Core Crystal.

Kora

Element: Electric
Role: Healer
Field Skills: Girls’ Talk, Electric Mastery, Lockpicking
Kora can be obtained from a Common, Rare, or Legendary Core Crystal.

KOS-MOS

Element: Light
Role: Attacker
Field Skills: Light Mastery, Lockpicking, Mental Arithmetic
KOS-MOS can be obtained from a Common, Rare, or Legendary Core Crystal.

Mythra

Element: Light
Role: Attacker
Field Skills: Light Mastery, Focus, Girls’ Talk
Mythra is obtained through the main story progression, and can only be used by Rex.

Newt

Element: Fire
Role: Tank
Field Skills: Superstrength, Salvaging Mastery, Titan Weapon Wisdom
Newt is obtained from a Common, Rare, or Legendary Core Crystal.

Nia

Element: Water
Role: Healer
Field Skills: Water Mastery, Forestry, Fortitude
Nia is obtained through the main story progression, and can only be used by Rex.

Nim

Element: Earth
Role: Healer
Field Skills: Earth Mastery, Ichthyology, Phonex Linguistics
Nim is obtained from a Common, Rare, or Legendary Core Crystal.

Pandoria

Element: Electric
Role: Attacker
Field Skills: Electric Mastery, Lockpicking, Icthyology
Pandoria is obtained in the main story progression, and can only be used by Zeke.

Perceval

Element: Dark
Role: Tank
Field Skills: Dark Mastery, Leaping, Assassination
Perceval is obtained from a Common, Rare, or Legendary Core Crystal.

Perun

Element: Ice
Role: Attacker
Field Skills: Ice Mastery, Ancient Wisdom, Chivalry
Perun is obtained from a Common, Rare, or Legendary Core Crystal.

Poppi alpha

Element: Earth (can be changed)
Role: Tank (can be changed)
Field Skills: Leaping, Nopon Wisdom, Superstrength
Poppi alpha is obtained through the main story progression, and can only be used by Tora.

Poppi QT Pi

Element: Ice (can be changed)
Role: Attacker (can be changed)
Field Skills: Keen Eye, Ancient Wisdom, Forestry
Poppi QT Pi is obtained by completing the Powered-Up Poppi side quest, and can only be used by Tora.

Poppi QT

Element: Fire (can be changed)
Role: Tank (can be changed)
Field Skills: Lockpicking, Fortitude, Agronomy
Poppi QR is obtained through the main story progression, and can only be used by Tora.

Praxis

Element: Water
Role: Attacker
Field Skills: Girls’ Talk, Water Mastery, Salvaging Mastery
Praxis is obtained by completing the Crystal Clear side quest.

Pyra

Element: Fire
Role: Attacker
Field Skills: Fire Mastery, Focus, Cooking
Pyra is obtained through the main story progression, and can only be used by Rex.

Roc

Element: Wind
Role: Attacker
Field Skills: Wind Mastery, Miasma Dispersal, Lockpicking
Roc is obtained through the main story progression, and can only be used by Vandham and Rex.

Sheba

Element: Water
Role: Attacker
Field Skills: Girls’ Talk, Lockpicking, Eye for Beauty
Sheba can be obtained by purchasing the Inherited Core Crystal from Torigoth (Gormott Province).

Theory

Element: Ice
Role: Tank
Field Skills: Ice Mastery, Focus, Nopon Wisdom
Theory can be obtained by completing the Blade-Sharp Memory side quest.

Ursula

Element: Ice
Role: Healer
Field Skills: Harmony, Ichthyology, Fortitude
Ursula can be obtained from a Common, Rare, or Legendary Core Crystal.

Vale

Element: Dark
Role: Attacker
Field Skills: Dark Mastery, Girls’ Talk
Vale can be obtained from a Common, Rare, or Legendary Core Crystal.

Vess

Element: Electric
Role: Healer
Field Skills: Forestry, Fortitude, Dumpling Pro
Vess can be obtained by completing the Tranquility side quest.

Wulfric

Element: Earth
Role: Attacker
Field Skills: Superstrength, Earth Mastery, Focus
Wulfric can be obtained by using the Beastly Core Crystal that is received through the main story progression.

Zenobia

Element: Wind
Role: Attacker
Field Skills: Wind Mastery, Superstrength, Leaping
Zenobia can be obtained from a Common, Rare, or Legendary Core Crystal.

The post Xenoblade Chronicles 2 Rare Blades, Core Crystals And Where To Find Them appeared first on Nintendo Insider.

Xenoblade Chronicles 2 Battle System Guide: Breaking Down The Combat Mechanics

$
0
0

Nintendo and Monolith Soft has made strides in steadily teaching you the Xenoblade Chronicles 2 battle system, but, as with all great role-playing games, it can soon become a challenge to piece everything together in your mind.

The shorter explanation to the Xenoblade Chronicles 2 battle system and battle mechanics is that Auto-Attacks steadily charge Driver Arts which in turn power Specials that can be chained with other party characters to perform Blade Combos. But if you are looking for more detail, please feel free to read on!

Xenoblade Chronicles 2 Battle System Basics: Auto-Attack And Enemy Weaknesses

Once you have chosen to engage an enemy in Xenoblade Chronicles 2, any character that is standing within range will start mercilessly swinging their weapon at them without requiring the player to mash a button. This is referred to as Auto-Attack and sees your party repeatedly strike the enemy in patterns with three consecutive blows, with each blow being stronger than the last.

It’s worth taking a moment to check which Blades you have equipped, as, not only do they have different weapons that will determine their attack speed, but you will want to learn to exploit any elemental weakness that an enemy has. If you look at the enemy’s health bar at the top of the screen, if a Water icon is shown that means that it is weak against water attacks and, therefore, a Blade such as Dromarch can call on Specials to lend you an advantage.

xenoblade-chronicles-2-driver-stats-screenshot

Driver Stats

As your characters level up in Xenoblade Chronicles 2, you will, unsurprisingly, see them strengthen to become more resilient over time. That will see their Driver Stats steadily increase, and, while the terminology will be familiar to those that have played a role-playing game before, it’s probably worth us breaking down what they refer to – especially as the accessories that you choose can boost them even further.

HP is the easiest to understand in that it represents the Driver’s health, and when reduced to zero will see them collapse in a heap on the floor. Strength affects the damage that you deal from physical Arts, while Ether will affect the damage (or healing) dealt from Ether Arts.

Then, Dexterity affects accuracy of your attacks, Agility affects a character’s chance to evade enemy attacks, and Luck makes it easier for a character to resist an enemy’s debuffs or reactions. And, to meander slightly off-topic, the higher a Driver’s luck stat value, the better their chances of awakening Rare Blades.

Driver Arts

Each Blade that you can equip in Xenoblade Chronicles 2 not only has their own weapon but each has access to four Driver Arts, although only three can be used at any time. These present the chance to deal more damage compared to the Auto-Attack with the chance to score bonus damage when attacking from the side or behind an enemy, for example. The more useful Driver Arts can scatter luminous green health potions to keep your party in the fight, or inflict Break or Topple effects – which we’ll explain more about later.

These Driver Arts are assigned to the X, Y, and B Buttons on your Joy-Con or Nintendo Switch Pro Controller, and, before they can be used, they must be steadily charged with continuous Auto-Attacks. The more potent Driver Arts take longer to charge than others which won’t come as a surprise, but you will see a red outline build around their respective icons in the bottom-right corner of the screen. Once this has wrapped all the way around them, they become charged and can be used to then start to recharge again.

xenoblade-chronicles-2-driver-arts-screenshot

Weapon Points (WP) And Skill Points (SP)

It’s worth taking a moment to talk about Weapon Points (WP) and Skill Points (SP) in Xenoblade Chronicles 2, which are a steady reward for your efforts in battle. These are important as they will help strengthen your party’s abilities, and, if forgotten about, can make your progression become increasingly tougher.

WP is required to level up Driver Arts, increasing the damage that they can deal, reducing how long they take to charge, or increasing the chances that they inflict a Break effect, or produce more potions, for example. Whereas SP is used to unlock passive skills on each character’s Affinity Chart, with the opportunity to increase their Strength or see them leap into battle with a Driver Art already charged.

Aggro

Whenever a Driver is being attacked by an enemy in Xenoblade Chronicles 2, they will be marked with a red ring which is referred to as the Aggro Marker. The red wedges on this marker indicate the direction that the character is being attacked from, with Aggro, as a term, measuring an enemy’s aggression toward the Driver that they are fighting.

As the game explains, the more viciously you attack an enemy the more it will want to attack you back. That means that it is dangerous for Healers that have lower HP, but you can rely on Tank characters such as Tora to draw Aggro towards them and absorb an enemy’s attacks. Then, an Attacker character such as Rex can focus on dealing damage, leaving the Healer to heal everyone.

Nintendo and Monolith Soft mention their own cheat sheet, which is: “Defenders take the hit, Healers heal Defenders, and Fighters hurt the enemy.”

Cancel Attacks

If you use a Driver Art just as an Auto-Attack connects, a ring of light will appear around your character. This visual prompt tells you that a Cancel Attack has been successful,
which, to get to the point, will make the Driver Art more effective than if it was used normally and the recharge gauge will fill up faster afterwards.

Also, how much more effective it is will depend on the stage of the Auto-Attack – landing a Cancel Attack on the third blow will be the strongest, but it will mean that you pull them off at a slower pace.

xenoblade-chronicles-2-driver-combo-screenshot

Driver Combo

The Driver Combo gauge will appear above the enemy’s health bar whenever someone inflicts Break to destabilise their stance. This will be a familiar mechanic to those that have played Xenoblade Chronicles or Xenoblade Chronicles X, and can be chained with other effects to temporarly increase the damage that you inflict on that enemy.

The four stages are Break, Topple, Launch, and Smash, with each requiring a specific Driver Art to inflict them. More often than not you will have Break and Topple, but, as you unlock more Blades and Rare Blades, you will want to see whether you can equip others to be able to regularly chain the four stages from start to finish.

The important thing, here, is that the limited window that these effects have will present you with the chance to deal more damage to a Toppled or Launched enemy with Smash sending them hurtling back into the ground.

Blade Arts

Blade Arts in Xenoblade Chronicles 2 are something that you needn’t worry about as much, seeing as the Blades that you equip are never under your direct control.

While going toe-to-toe with your enemy, the Blades will steadily buff your characters to help sway a battle in your favour. These are entirely determined by the game, but can, as examples, see your accuracy increase, Driver Arts refill faster, or damage output increase, and one thing that you will want to do is to look at a Blades‘ Affinity Chart and make sure that you are partly concentrating on making them grow to unlock more skills – stronger Blades undoubtedly help your party’s chances, so, as with WP and SP, make sure that you don’t forget about them.

Specials

When you use Driver Arts in battle you steadily charge your Blade’s Special, which will steadily build over four tiers. As can be expected, the higher the tier the more potent these Specials are, and, as with Driver Arts, you can perform a Cancel Attack when activating them with the A Button. There will be a short quick time event that follows which usually ends up with the player repeatedly hammering the B Button, and, as with everything else in Xenoblade Chronicles 2, make sure that you look to exploit an enemy’s weakness for more damage.

You can also prompt the other characters in your party to use their Special, too. The white orbs that circle their respective icons indicate what tier their specials have reached – a single white orb for tier one, a second being added for tier two, and a third for tier three. Which leads us neatly on to performing Blade Combos.

Blade Combo

This is where the Xenoblade Chronicles 2 battle system starts to present you with the chance to really deal heavy damage to your enemies. Once any of your characters perform a Special, you can choose to chain them with other Specials to inflict a Blade Combo for heightened damage.

The potential chains that you can look to perform are shown in the top-right corner of the screen, where you will see the element that you just used splinter into two elements, that themselves then splinter into another two elements. Between them, there are four different Blade Combos that you can perform, although that will be down to whether you have Blades equipped with the required elements.

The golden rule here is that each Special that you use has to be one level higher than the previous one, which means that, broken down, a Blade Combo is performed with a Level 1, Level 2, and then a Level 3 Special.
The benefit to this is that you can inflict a Sealing Effect on your enemy that will depend on the Blade Combo route that you performed.

This is advantageous as once inflicted, the enemy will acquire a resistance to the Blade Combo‘s element that will see an element orb designating the resistance swirl around them. And, while attacking the enemy with that same element will do greatly reduced damage, what we will really want to do next is to smash this element orb to deal colossal damage to the enemy.

Chain Attack

If you ever want to take your party’s teamwork to the next level, you can coordinate their efforts with Chain Attacks. This relies on the Party Gauge that appears in the top-left corner of the screen to be full, which is otherwise used to revive any incapacitated characters in your party.

When all three sections are fully charged, you can launch a Chain Attack by pressing the Start Button. During a Chain Attack, each of your party members takes a turn to choose to perform a Special with any of the Blades that they have equipped. This happens in rounds, and once every character has taken a turn there is a chance that, if you perform the quick time events successfully, that you can get another round in to deal more damage.

The reason that Chain Attacks are the last piece of the puzzle to the Xenoblade Chronicles 2 battle system, is that they can be used to destroy the element orbs that attach to your enemies when using Specials to perform a Blade Combo.

If you use an opposing element against these orbs – such as fire being the opposite of water, for example – you have the chance to smash them to cause devastating damage to your enemy. And if it smashes, when you next start a Chain Attack the Party Gauge will be replaced with the Full Burst Gauge. This will fill up a little each time you smash an element orb, and once full, a Full Burst will initiate that will let you deal a ludicrous amount of damage.

The post Xenoblade Chronicles 2 Battle System Guide: Breaking Down The Combat Mechanics appeared first on Nintendo Insider.

Pokémon GO Mew Event: How To Catch The Mythical Pokémon

$
0
0

Niantic added Special Research tasks to Pokémon GO this week, presenting the chance to catch Mew for the first time in the location-based game.

After studying Pokémon and their habitats, Professor Willow has recently found some hints of something mysterious and asks for your help to discover the Mythical Pokémon.

This will challenge you to work your way through eight groups of Special Research tasks in a story-based quest called “A Mythical Discovery,” and, once complete, you will be rewarded with an unmissable opportunity to catch Mew and add the New Species Pokémon to your Pokédex.

These are relatively simple tasks to accomplish that offer their own rewards upon completion, but, what’s important to note, is that they must be done in order – meaning that you shouldn’t try to jump ahead of yourself.

How To Complete Pokémon GO Mew Event ‘A Mythical Discovery’

A Mythical Discovery: 1 of 8

Special Research Tasks:

  • Spin 5 PokéStops
  • Catch 10 Pokémon
  • Transfer 5 Pokémon

Rewards: 500 XP, 10 Great Balls, 1 Incubator, 3 Lure Modules

A Mythical Discovery: 2 of 8

Special Research Tasks:

  • Earn 2 Candies from Walking
  • Make 10 Great Throws
  • Hatch 3 Eggs

Rewards: 1000 XP, 2000 Stardust, 3 Incense, 20 Great Balls

A Mythical Discovery: 3 of 8

Special Research Tasks:

  • Reach Trainer Level 15
  • Battle in a Gym twice
  • Battle in a Raid twice

Rewards: 1500 XP, 1 Charge TM, 1 Fast TM, 2 Star Pieces

A Mythical Discovery: 4 of 8

Special Research Tasks:

  • Earn the Silver Kanto Medal
  • Evolve 20 Pokémon
  • Earn 5 Candies from Walking

Rewards: 2000 XP, 4000 Stardust, 3 Lure Modules, 20 Great Balls

A Mythical Discovery: 5 of 8

Special Research Tasks:

  • Catch a Ditto
  • Make 20 Great Throws
  • Catch 10 Ghost-type Pokémon

Rewards: 2500 XP, 1 Premium Raid Pass, 1 Lucky Egg, 15 Revives

A Mythical Discovery: 6 of 8

Special Research Tasks:

  • Evolve a Magikarp
  • Battle 10 Raids
  • Reach Trainer Level 25

Rewards: 3000 XP, 6000 Stardust, 5 Rare Candy, 3 Incense

A Mythical Discovery: 7 of 8

Special Research Tasks:

  • Catch 50 Pokémon using a Berry
  • Make 1 Excellent Curve Throw
  • Earn a Gold Kanto Medal

Rewards: 3500 XP, Mew Encounter, 20 Ultra Balls, 8000 Stardust

A Mythical Discovery: 8 of 8

Special Research Tasks:

  • Catch Mew

Rewards: 4000 XP, 10000 Stardust, 1 Super Incubator, 20 Mew Candy

The post Pokémon GO Mew Event: How To Catch The Mythical Pokémon appeared first on Nintendo Insider.

Pokémon Quest Poké Mart: Decorations, Box Expansions And How To Get More PM Tickets

$
0
0

Pokémon Quest has appeared out of nowhere on the Nintendo eShop for Nintendo Switch, and, after spending some time with Game Freak’s new, free-to-start RPG, you will soon make a visit to the Poké Mart.

The Poké Mart is where you can buy Decorations that will help your adventures on Tumblecube Island in Pokémon Quest, handy items with special effects that will make your expeditions more efficient and have greater rewards. These activate automatically once you buy them, and you can also use them to decorate your base camp.

You will need PM Tickets to buy anything from the Poké Mart in Pokémon Quest, and, while you can choose to part with real-world money to get more on the Nintendo eShop, you will receive 50 PM Tickets for free every 24 hours once they have been collected from the Membership Service.

These can then be used to buy Decorations and Box Expansions, which we have listed out below:

Pokémon Quest Decorations

  • Blastoise Fountain – 300 PM Tickets

Special Effect: Size of blue ingredient drops x 2

  • Bulbasaur Flag – 150 PM Tickets

Special Effect: Exp. received from Level-Up Training x 1.5

  • Charizard Torch – 300 PM Tickets

Special Effect: Size of red ingredient drops x 2

  • Charmander Flag – 200 PM Tickets

Special Effect: Success rate of Move-Learning Training x 1.5

  • Ditto Balloon – 700 PM Tickets

Special Effect: Success rate of Move-Learning Training x 2

  • Dodrio Tent – 50 PM Tickets

Special Effect: Size of gray ingredient drops x 1.5

  • Fearow Weathervane – 500 PM Tickets

Special Effect: Exp. received from Level-Up Training x 2

  • Flareon Cusheon – 50 PM Tickets

Special Effect: Size of red ingredient drops x 1.5

  • Jolteon Cusheon – 50 PM Tickets

Special Effect: Size of yellow ingredient drops x 1.5

  • Kangaskhan Swing Chair – 800 PM Tickets

Special Effect: Chance for Pokémon with a multi-socket x 2

  • Mechanical Tauros – 300 PM Tickets

Special Effect: Size of gray ingredient drops x 2

  • Meowth Balloon – 400 PM Tickets

Special Effect: Number of ingredients received from recycling x 2

  • Mewtwo Arch – 700 PM Tickets

Special Effect: Maximum battery charges +1

  • Pikachu Surfboard – 400 PM Tickets

Special Effect: Chance of attracting multiple Pokémon with your cooking x 1.5

  • Prolific Statue – Free

Special Effect: Exp. from expeditions for Pokémon up to Lv. 5 x 1.5

  • Squirtle Flag – 100 PM Tickets

Special Effect: Number of ingredients received from recycling x 1.5

  • Vaporeon Cusheon – 50 PM Tickets

Special Effect: Size of blue ingredient drops x 1.5

  • Venusaur Planter – 300 PM Tickets

Special Effect: Size of yellow ingredient drops x 2

  • Victreebel Golf Bag – 200 PM Tickets

Special Effect: Chance for Pokémon with a multi-socket x 1.5

Pokémon Quest Box Expansions

  • Pokémon Box Expansion – 50 PM Tickets

Increase the Pokémon buddies you can have by 20 (now 20/300).

  • Stone Box Expansion – 50 PM Tickets

Increase the Power Stones you can have by 20 (now 20/300).

The post Pokémon Quest Poké Mart: Decorations, Box Expansions And How To Get More PM Tickets appeared first on Nintendo Insider.

Pokémon Quest Recipes Guide: Ingredients, Dishes And How To Catch New Pokémon

$
0
0

Pokémon Quest recipes are the most important thing to know in the new free-to-start RPG on Nintendo Switch. It’s more than likely that you will want to know how to catch new Pokémon as you explore Tumblecube Island, and, unlike the mainline games, this will require that you cook the ingredients that you start to collect on your expeditions.

As MoBee explains to you in the game, simply cooking up a storm will attract Pokémon. The pocket monsters that like the recipes that you cook will then visit your base camp, and you can choose to befriend them – something that is useful early on to expand your team beyond your starter Pokémon, Pidgey and Rattata.

Luckily, cooking is a simple gameplay mechanic in Pokémon Quest, simply challenging you to tap an ingredient to throw it in your cooking pot that, once filled, will start to be cooked – setting out on expeditions being how you pass the time until it is ready, or you can choose to use PM Tickets to speed things up.

You are free to experiment with the ingredients that you gather in Pokémon Quest, but, to save some time, we have worked to list the recipes that both ourselves and other players have been discovered so far.

Pokémon Quest Recipes

Recipe: Mulligan Stew à la Cube
Ingredients: Whatever ingredients you like
Pokémon It Attracts: Favorite food of some Pokémon on Tumblecube Island

Recipe: Red Stew à la Cube
Ingredients: A whole lot of red
Pokémon It Attracts: Favorite food of reddish Pokémon

Recipe: Blue Soda à la Cube
Ingredients: A whole lot of blue
Pokémon It Attracts: Favorite food of bluish Pokémon

Recipe: Yellow Curry à la Cube
Ingredients: A whole lot of yellow
Pokémon It Attracts: Favorite food of yellowish Pokémon

Recipe: Gray Porridge à la Cube
Ingredients: A whole lot of gray
Pokémon It Attracts: Favorite food of grayish Pokémon

Recipe: Mouth-Watering Dip à la Cube
Ingredients: A whole lot of soft things and a lot of blue
Pokémon It Attracts: Favorite food of Water-type Pokémon

Recipe: Plain Crepe à la Cube
Ingredients: A lot of sweet things and a few gray
Pokémon It Attracts: Favorite food of Normal-type Pokémon

Recipe: Sludge Soup à la Cube
Ingredients: A whole lot of mushrooms and a lot of soft things
Pokémon It Attracts: Favorite food of Poison-type Pokémon

Recipe: Mud Pie à la Cube
Ingredients: A few minerals and a lot of soft things
Pokémon It Attracts: Favorite food of Ground-type Pokémon

Recipe: Veggie Smoothie à la Cube
Ingredients: A whole lot of plants and a few soft things
Pokémon It Attracts: Favorite food of Grass-type Pokémon

Recipe: Honey Nectar à la Cube
Ingredients: A whole lot of sweet things and a lot of yellow
Pokémon It Attracts: Favorite food of Bug-type Pokémon

Recipe: Brain Food à la Cube
Ingredients: A lot of sweet things and a few hard things
Pokémon It Attracts: Favorite food of Psychic-type Pokémon

Recipe: Stone Soup à la Cube
Ingredients: A whole lot of hard things and a few minerals
Pokémon It Attracts: Favorite food of Rock-type Pokémon

Recipe: Light-as-Air Casserole à la Cube
Ingredients: A lot of minerals and a few plants
Pokémon It Attracts: Favorite food of Flying-type Pokémon

Recipe: Hot Pot à la Cube
Ingredients: A lot of mushrooms and a little red
Pokémon It Attracts: Favorite food of Fire-type Pokémon

Recipe: Watt a Risotto à la Cube
Ingredients: A whole lot of soft things and a lot of yellow
Pokémon It Attracts: Favorite food of Electric-type Pokémon

Recipe: Get Swole Syrup à la Cube
Ingredients: A lot of sweet things and a few mushrooms
Pokémon It Attracts: Favorite food of Fighting-type Pokémon

Recipe: Ambrosia of Legends à la Cube
Ingredients: A whole lot of mystical things
Pokémon It Attracts: Favorite food of extremely rare Pokémon

Pokémon Quest Ingredients

You will have noticed from the recipe list that different ingredient types are required to create them. These hints can be slightly vague to encourage you to experiment with whatever you have collected from your expeditions.

If you are looking for a few pointers to save you time, we’ve listed the ingredients and the words that are used to describe them to help you know what to throw into the cooking pot for a particular recipe:

Apricorns: yellow, hard, small, vegetables
Balm Mushrooms: grey, soft, precious, mushrooms
Big Roots: big, red, soft, precious, vegetables
Bluk Berries: blue, soft, small, sweet
Fossils: grey, hard, small, minerals
Honey: yellow, soft, precious, sweet
Icy Rocks: blue, hard, precious, minerals
Tiny Mushrooms: red, soft, small

The post Pokémon Quest Recipes Guide: Ingredients, Dishes And How To Catch New Pokémon appeared first on Nintendo Insider.

Pokémon Quest Evolution Tips: How To Evolve Your Pokémon

$
0
0

It has been less than a day since the free-to-start RPG was released as a surprise on the Nintendo eShop for Nintendo Switch, but many are now wondering how evolution works in Pokémon Quest and how to evolve specific Pokémon.

That becomes a far more pressing concern when the game recommends an ever greater team strength number for the expeditions that your pocket monsters can set out on. It’s a challenge and, while in the mainline games we would be running around in tall grass defeating the Pokémon we bump into or having a rematch against the Elite Four for more experience points, in Pokémon Quest it’s not quite as straightforward.

On a basic level, evolving your Pokémon in Pokémon Quest still works in the same way. From what we have found so far, the Pokémon will evolve at the same levels as they would in the mainline games – it’s just reaching those levels that soon becomes the greatest challenge that you must constantly grind for.

For example, levelling up Squirtle will see the Tiny Turtle Pokémon evolve into Wartortle at Level 16 and then into Blastoise at Level 36. No surprises there. But, even after spending a few hours with Pokémon Quest you will soon realise how much time it will actually take to reach those levels…

We have now detailed how to evolve Eevee in Pokémon Quest, but for any Pokémon that normally evolve after trading you simply need to level them up – which means more grinding.

While catching new Pokémon relies on using ingredients cooking recipes and fancier cooking pots will reward you with the chance to catch Pokémon at a higher level, you will need to repeatedly send them out on expeditions to level them up. This is important to steadily increase their Attack and Hit Points, which is something that evolution similarly helps to boost.

You can choose to train your Pokémon if you want to save some time, but in the Level Up option in Training (accessed on the Edit Team menu), you will need to say goodbye to a supporting Pokémon that you choose once it is over. That’s a problem early on when you only have a handful of pocket monsters and aren’t likely to have duplicates that you are willing to sacrifice.

The amount of experience that the Pokémon will gain will depend on the supporting Pokémon, too. You can choose as many as four to wave goodbye to at once, but the game isn’t generous with the levels that your Pokémon will gain. If we chose a Level 25, 22 and 19 Pokémon, a Level 10 Pokémon would only be boosted up to Level 15. That’s not great. But, know that you at least get more experience if you use higher level Pokémon, evolved Pokémon and those of the same species – something that we haven’t been able to test yet.

Pokémon Quest clearly wants you to rely on Power Stones and Move Stones to strengthen your team, with your Pokémon’s evolutions coming naturally in time. That doesn’t help particularly, but know that there are no easy shortcuts to take at this point and good luck with the grinding.

The post Pokémon Quest Evolution Tips: How To Evolve Your Pokémon appeared first on Nintendo Insider.

How To Evolve Eevee In Pokémon Quest

$
0
0

We have already talked about how to evolve your pocket monsters in Pokémon Quest, but one question that everyone is still asking is how to evolve Eevee?

You can choose the Evolution Pokémon as your starter companion in this free-to-start RPG, but, as most will know from the mainline games, you would normally need to use a Water Stone, Thunder Stone or Fire Stone to evolve it into Vaporeon, Jolteon or Flareon.

Sadly, the way to evolve Eevee in Pokémon Quest is far less exciting. Once it reaches Level 36, Eevee will randomly evolve into Flareon, Vaporeon or Jolteon. And, well… that’s it.

Players had believed that the evolution path could be determined by the coloured slot where Eevee was placed in your team – evolving into Flareon if placed in the red slot, Vaporeon in the blue slot or Jolteon in the green slot – but, as more have had the chance to try the method has been proven wrong.

If you need more tips and pointers to get started in Pokémon Quest, we have a separate article with advice on how to evolve your Pokémon.

The post How To Evolve Eevee In Pokémon Quest appeared first on Nintendo Insider.


Pokémon Quest Bingo Bonus: How To Strengthen Your Best Team

$
0
0

If you didn’t know, every pocket monster in Pokémon Quest has their own Bingo Bonus to consider. However, while we’re told that a Pokémon’s strength is determined by the Power Stones that it uses, the Bingo Bonus is a gameplay mechanic that is never explained in the free-to-start action RPG.

If you are wondering what the Bingo Bonus is, first head to the screen where you can allocate Power Stones to any slots that your Pokémon have unlocked. In the top-right corner, you will see a magnifying glass icon that, once tapped, will show a far more detailed breakdown about that Pokémon’s strength.

It more clearly shows you how their base Hit Points (HP) and Attack (ATK) are improved by the Power Stones that they are using, but you will soon notice the Bingo Bonus section. While swapping out your Power Stones for the more powerful ones that you are rewarded with on your Expeditions is important, the Bingo Bonus is something else that you will want to pay attention to.

The way it works is that as you level your team up in Pokémon Quest you will continue to unlock more Power Stone slots for the Pokémon that you are using. When you unlock three slots in a row and fill them with Power Stones, that Pokémon will activate a Bingo Bonus – with each having three in total.

As you can see with my Paras (soon to be a Parasect), I have been able to fill two rows with three Power Stones that has unlocked two Bingo Bonuses. So far, that has reduced the wait time for any Grass-Type moves to recharge by 5 percent and increased the HP that the Mushroom Pokémon has whenever it recovers after being knocked out in an Expedition by 20 percent.

I’m also about to unlock another Power Stone slot that will let me activate the last Bingo Bonus, which is the most beneficial seeing as it will boost the Pokémon’s Attack by a massive 550. It’s clear to see, then, that these are an important aspect to consider when playing Pokémon Quest, especially when the difficulty starts to significantly ramp up in the later Worlds.

The post Pokémon Quest Bingo Bonus: How To Strengthen Your Best Team appeared first on Nintendo Insider.

How To Save In Pokémon Quest

$
0
0

How to save in Pokémon Quest. That’s the question that the more than one million players that have been spending hours with the free-to-start action RPG since it released this week have been asking.

It’s an understandable concern too, seeing as the mainline games require that you manually save – resulting in the constant fear that your Nintendo 3DS battery may run out or you will accidentally close the game, losing you hours of grinding or Pokédex hunting in the process.

In Pokémon Quest, there is less reason to worry. The game regularly autosaves but, unfortunately, isn’t particularly clear about where or when it actually does so. In looking to help, we’ve experimented in an effort to see where it does and doesn’t save to hopefully make you fret less.

The autosave appears to happen whenever you move between menus, whether that be loading the Expeditions map or Base Camp. And, understandably, you can’t save when your pocket monsters are out on an Expedition.

Remember that Game Freak has developed the action RPG for both Nintendo Switch and mobile, so the autosave frequency is likely more of a concern that players would close the app and accidentally lose their progress. The benefit is that you don’t need to worry as much as normal.

Pokémon Quest is now available on the Nintendo eShop for Nintendo Switch worldwide and will release on mobile later this month.

The post How To Save In Pokémon Quest appeared first on Nintendo Insider.

Pokémon Quest Power Stones: What They Are And How To Get More

$
0
0

In Pokémon Quest, Power Stones are items that you will soon come to rely on to strengthen your best Pokémon team. But, what are they exactly and how can you get more?

You will be rewarded with Power Stones and ingredients for cooking recipes with whenever you complete an Expedition in Pokémon Quest, and there’s a chance that you can randomly earn more from the enemy Pokémon that you defeat along the way.

The Power Stones can be used to fill the nine slots that each Pokémon will eventually have access to as you level them up, and, if you place three in a row, the benefit is that you will receive a Bingo Bonus that will make them even stronger.

These come in two types: those that boost the power of a Pokémon’s Attack, and those that will give them more Health Points. And then there are Move Stones, like the Whack-Whack Stone, Wait Less Stone or Stay Strong Stone, that can be used to make your Pokémon’s special moves more powerful or recharge quicker.

What you will soon learn is that you won’t have much choice in which Power Stones can be placed in which slots. Game Freak has tried to balance Pokémon Quest as best they can, meaning that the Power Stone type that you can place in slots is locked – although you may find that some Pokémon have slots that will let you use either an Attack or Health Point-related Power Stone.

Your continued progress in the game will reward you with stronger Power Stones than those that you collect in your earlier time with it. But be warned, as you will only be able to hold 20 Power Stones at a time. That’s unless you choose to spend PM Tickets in the Poké Mart on Stone Box Expansions to unlock for more storage space.

The post Pokémon Quest Power Stones: What They Are And How To Get More appeared first on Nintendo Insider.

How To Get More Cooking Pots In Pokémon Quest

$
0
0

After piling up ingredients to cook recipes, you may be wondering how to get more Cooking Pots in Pokémon Quest. The free-to-start action RPG provides you with one Cooking Part to stew your recipes in, but, as you will soon come to realise, that makes for slow progress in attracting new Pokémon to your Base Camp.

You can see dug up areas in your Base Camp for more Cooking Pots, but, unfortunately, as you continue to progress even further in the game, your only reward will be better quality Cooking Pots that will let you throw in more ingredients to make more potent recipes.

That still leaves the question as to exactly how you can get more Cooking Pots? Well, there’s an easy answer to that. Money. You will need to buy the Expedition Pack (£4.49 / €4.99), Great Expedition Pack (£8.99 / €9.99) and Ultra Expedition Pack (£16.19 / €17.99) to get them, with each pack unlocking one more Cooking Pot as well as other rewards in exchange for your decision to spend money on the game.

The benefit to buying the downloadable content comes in that you also receive models, statues, decorations, PM Tickets and even Pokémon that will lend you an advantage in conquering the Expeditions that your Pokémon set out on.

There is also the Triple Expedition Pack (£26.99 / €29.99), or Expedition 3-Pack Bundle as it is has been called in North America, that will save you some money when compared to choosing to buy the packs individually. But then, only those that are really enjoying their time with Pokémon Quest will want to spend that much.

The post How To Get More Cooking Pots In Pokémon Quest appeared first on Nintendo Insider.

Mario Tennis Aces Zone Shots, Zone Speed And Special Shots

$
0
0

Spring is here, and, with our chance to step on to the court in Mario Tennis Aces drawing ever closer, Nintendo has broken details on Zone Shots, Zone Speed, and Special Shots in the Nintendo Switch exclusive.

Zone Shots

Zone Shots are a new type of shot introduced in this game. It’ll let you decide exactly where to aim your shot. The far corner of the court? Sure. The opposite side to your opponent? Go for it! Just use motion controls to pinpoint where that shot will go.

But that’s not all! The real strength of the Zone Shot is this. Take a Zone Shot head-on and your racket will be damaged. Three Zone Shots and your racket will break. The number of rackets you can bring to a match is decided beforehand, and if all your rackets break, you’ll lose the match by KO!

Aiming at places your opponent can’t reach is a good way to rack up steady points, or you can be more direct – hit your opponent head-on and take out their rackets! As you can see, Zone Shots bring a new dimension of strategy to the game.

Zone Speed

When your racket can’t quite reach the ball your opponent returns… When you can’t react quickly enough to a Star Shot… That’s when you need a little bit of Zone Speed!

When you use Zone Speed, the world around you will slow down while you chase those hard-to-reach balls. Remember the Zone Shots we introduced before? With some good timing, you can block them and avoid damaging your racket, and Zone Speed makes it easier to perfect that timing.

But be aware that you can’t just use Zone Shots and Zone Speed whenever you feel like it! They deplete your Energy Gauge, so you’ll need to use them sparingly. Judging whether to spend your energy on an offensive Zone Shot or some defensive Zone Speed is the key to tennis success.

Special Shot

Special Shot is the trump card that becomes available once your Energy Gauge is full. A Special Shot will max out ball speed and shot power. It’ll deplete a hefty chunk of your Energy Gauge, but it can break an opponent’s racket in one hit! It takes three Zone Shots to break a racket, which goes to show how much stronger Special Shots are.

If you’re winning and want to cement your victory, or losing and want to turn the tables, a Special Shot is the way to go. If a Special Shot comes your way, then you can avoid the risk of breaking your racket by letting it through.

However, if you know you’ll lose if your opponent gets one more point, then you’ll have to rely on your skill and judgement to return that ball however you can!

Mario Tennis Aces will release exclusively for Nintendo Switch worldwide on June 22nd.

The post Mario Tennis Aces Zone Shots, Zone Speed And Special Shots appeared first on Nintendo Insider.

Viewing all 228 articles
Browse latest View live


Latest Images